Easy Visual Question Answering
A gentle introduction to Visual Question Answering (VQA) using neural networks.
| UPDATED
Quick - what sport is depicted in this image?

You probably immediately knew the answer: baseball. Easy, right?
Now imagine you’re a computer. You’re given that same image and the text ”what sport is depicted in this image?” and asked to produce the answer. Not so easy anymore, is it?
This problem is known as Visual Question Answering (VQA): answering open-ended questions about images. VQA is interesting because it requires combining visual and language understanding. A model that solves this task demonstrates a more general understanding of images: it must be able to answer completely different questions about an image, oftentimes even addressing different sections of the image.
This might seem like a pretty unapproachable problem at first, but in reality it’s probably more accessible than you think. In this post, we’ll explore basic methods for performing VQA and build our own simple implementation in Python. Here’s a demo of the final product of this post:
Caveat: this post assumes a basic knowledge of Convolutional Neural Networks (CNNs). My introduction to CNNs covers everything you need to know, so start there if necessary.
We’ll also be using Keras, a deep learning library for Python, to power our model, so I recommend reviewing my introduction to Neural Networks with Keras if you’ve never seen Keras code before.
Enough of this preface. Let’s get started!
Just looking for the source code / results? Skip to The Results.
1. The Dataset
The best known dataset for VQA can be found at visualqa.org and contains 200k+ images and over a million questions (with answers) about those images. Here are a few examples from the original VQA paper:

Impressive, right? Unfortunately, this level of VQA is outside of the scope of this blog post. We’ll instead be using a custom dataset created just for this blog post: easy-VQA.
The images in the easy-VQA dataset are much simpler:

The questions are also much simpler:
- What shape is in the image?
- What color is the triangle?
- Is there a green shape in the image?
- Does the image contain a circle?
In total, easy-VQA contains 5k images and ~50k questions, split into training (80%) and testing (20%) sets. The questions have 13 possible answers:
- Yes/No: Yes, No
- Shapes: Circle, Rectangle, Triangle
- Colors: Red, Green, Blue, Black, Gray, Teal, Brown, Yellow
2. The Approach
The standard approach to performing VQA looks something like this:
- Process the image.
- Process the question.
- Combine features from steps 1/2.
- Assign probabilities to each possible answer.
Notice that we’re working with a fixed answer set where exactly one of the possible answers is guaranteed to be correct. This makes our lives a lot easier because we don’t have to generate the correct answer, we just have to answer what is effectively a multiple-choice question. Most cutting-edge VQA systems out there have 1000 possible answers, but for this post we’ll only allow the 13 possible answers included in easy-VQA.
Steps 1 and 2 generally use methods from Computer Vision and Natural Language Processing, respectively, to turn raw image / text inputs into processed data vectors. These two output representations can then be used analyzed together to ultimately pick the most likely answer.
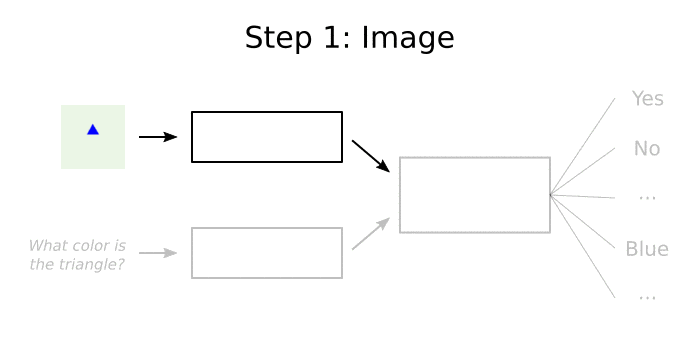
An Example
Here’s a very simple example of how a VQA system might answer the question “what color is the triangle?” about the image in the visualization above:
- Look for shapes and colors in the image. A simple CNN could be taught to recognize that our image contains a triangle that is blue.
- Understand the question type. Since the question begins with “what color”, it’s easy to realize that the answer should be a color.
- For each possible answer choice, determine its “strength” based on info from the previous two steps. The answer “Blue” will have a high strength because:
- we know the image has a blue shape
- we know the answer should be a color
- Convert each answer’s “strength” to a probability using something like Softmax. The answer “Blue” will have close to 100% probability.
In the following sections, we’ll walk through the specifics of implementing each of these 4 steps for our easy-VQA dataset.
Code Setup
If you want to follow along with this post without starting from scratch, clone the easy-VQA-keras repo:
git clone https://github.com/vzhou842/easy-VQA-keras.git
cd easy-VQA-keras
pip install -r requirements.txt
Otherwise, if you do want to setup from scratch, make sure you’re using Python 3 and install a few packages:
pip install easy-vqa tensorflow Pillow numpyWe need TensorFlow, which comes packaged with Keras as its high-level API, and we’ll use Pillow for image processing. We’ll also be using the easy-vqa Python package, which makes it simple to access the easy-VQA dataset. More on that later - for now, let’s get started.
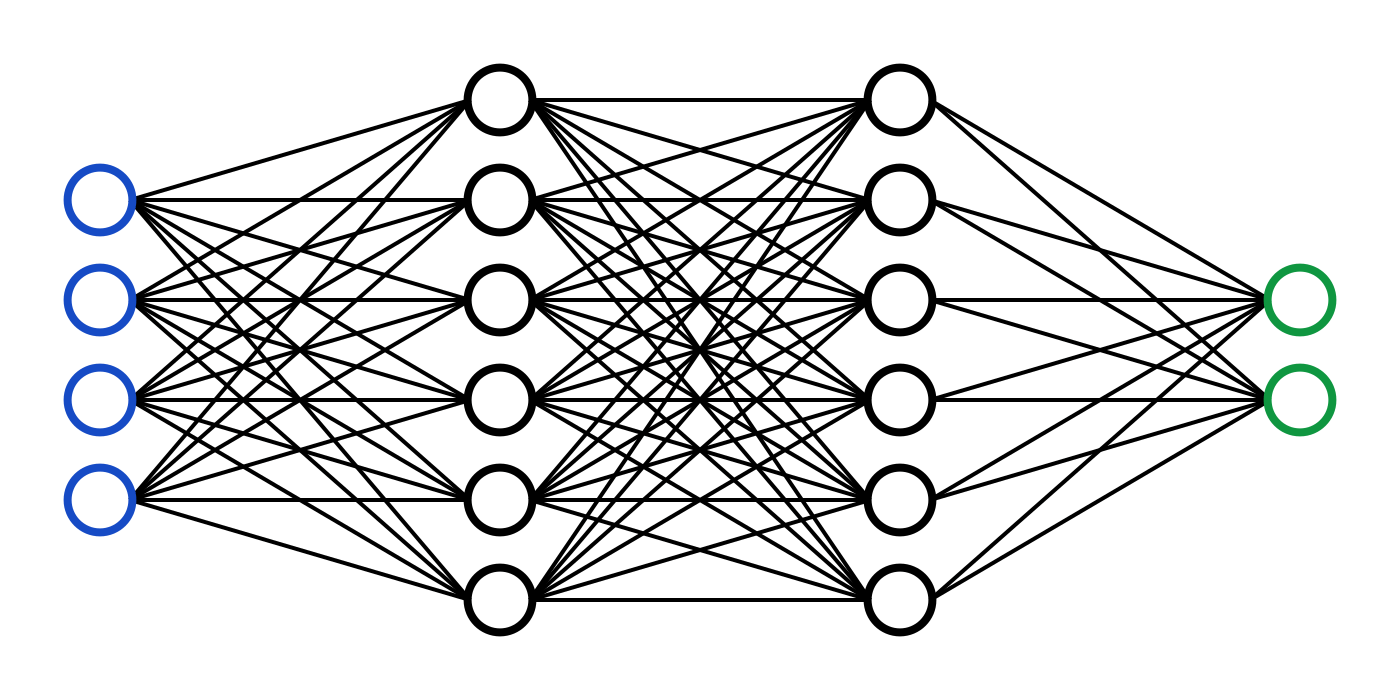
3. The Image Model
First up: our image model. As we’ve previously mentioned, we’ll build a Convolutional Neural Network (CNN) to extract information from the image input. To do this, we’ll use Keras, a beginner-friendly but powerful deep learning library for Python. I’ve already written a guide on using Keras to implement CNNs - it might help to open it in a new tab or skim it before continuing.
Our image dataset is not very complex, so we can tackle it with a relatively simple CNN:

- Start with a 64x64 image from the dataset.
- Pass through a conv layer with eight 3x3 filters using “same” padding, resulting in a 64x64x8 volume.
- Use a standard max pooling layer to cut the volume to 32x32x8.
- Pass through another conv layer, this time with 16 filters, resulting in a 32x32x16 volume.
- Use max pooling again, cutting to 16x16x16.
- Flatten the volume, which results in a layer with 16^3 = 4096 nodes.
Confused? All of the concepts above are covered in my intro to CNNs.
Here’s the code:
from tensorflow.keras.layers import Input, Conv2D, MaxPooling2D, Flatten

# The CNN
im_input = Input(shape=(64, 64))
x1 = Conv2D(8, 3, padding='same')(im_input)
x1 = MaxPooling2D()(x1)
x1 = Conv2D(16, 3, padding='same')(x1)
x1 = MaxPooling2D()(x1)
x1 = Flatten()(x1)
# Add a final fully-connected layer after the CNN for good measure
x1 = Dense(32, activation='tanh')(x1)
This code uses Keras’s Model (functional) API. We’re not using Keras’s Sequential model API because we’ll need to combine our image model and our question model later (you’ll see, keep reading).
4. The Question Model
Next up: our question model. Most VQA models would use some kind of Recurrent Neural Network (RNN) to process the question input, but that’s a little overkill for our use case. The questions in the easy-VQA dataset are short, simple, and come from a fixed set of question templates, so they’re much more approachable compared to those you might see in the real world.
Instead of a complicated RNN architecture, we’ll take a simpler approach:
- Use a Bag of Words (BOW) representation to turn each question into a vector.
- Use that vector as input to a standard (feedforward) neural network.
Don’t worry if you don’t entirely understand what that meant. We’ll go through both of those steps below.
Bag of Words (BOW)
A BOW representation turns any text string into a fixed-length vector by counting how many times each word appears in the text. I’ve written a short, beginner-friendly introduction to Bag-of-Words models - I’d recommend reading that now if you’re unfamiliar with them! From here on, I’m assuming you have a basic understanding of BOW models.
We’ll take advantage of Keras’s Tokenizer class to implement BOW:
from easy_vqa import get_train_questions, get_test_questions
from tensorflow.keras.preprocessing.text import Tokenizer

# Read questions
# train_qs and test_qs are just arrays of question strings
# (we'll use the other variables later)
train_qs, _, _ = get_train_questions()
test_qs, _, _ = get_test_questions()

# Fit tokenizer on the training questions
tokenizer = Tokenizer()
tokenizer.fit_on_texts(train_qs)

# Convert questions to BOW
train_X_seqs = tokenizer.texts_to_matrix(train_qs)
test_X_seqs = tokenizer.texts_to_matrix(test_qs)

# Example BOW:
# [0 0 1 1 0 1 0 0 1 0 0 1 1 0 0 0 0 0 0 0 0 0 0 0 0 0 0]
print(train_X_seqs[0])
Notice that we read question data from the easy-vqa package. If you want to see the details on those APIs, refer to the easy-vqa documentation.
Neural Network Time!
As discussed before, our question dataset is relatively simple, so we don’t need anything too fancy for our question model. We’ll just pass our BOW vector representation into 2 fully-connected (FC) neural network layers:

Reminder: fully-connected layers have every node connected to every output from the previous layer. We used fully-connected layers in my intro to Neural Networks if you need a refresher.
Here’s our implementation, which also uses Keras’s Model (functional) API:
from tensorflow.keras.layers import Input, Dense

# BOW code here...

# We add one because the Keras Tokenizer reserves index 0 and never uses it.
vocab_size = len(tokenizer.word_index) + 1

# The question network
q_input = Input(shape=(vocab_size,))
x2 = Dense(32, activation='tanh')(q_input)
x2 = Dense(32, activation='tanh')(x2)
The vocab_size variable is the length of our BOW vector representations, which are the inputs to our question model.
5. The Merge
We’ll use a very simple method to merge our image and question vectors: element-wise multiplication. Implementing this is a one-liner with Keras’s Multiply merge layer:
from tensorflow.keras.layers import Multiply

# The CNN
x1 = # ... code from above

# The question network
x2 = # ... code from above

out = Multiply()([x1, x2])
The out vector now contains information derived from both the image and the question.
An Example
To illustrate how this might be useful, consider this (somewhat contrived) example:
- The first element in the image vector is high when the image contains a blue shape and low otherwise.
- The first element in the question vector is high when the question contains the word “blue” and low otherwise.
Then the first element in the out vector will only be high when both the image and the question are related to the color blue. This result would be very useful in answering a question like “Is there a blue shape in the image?”
In reality, it’s unlikely that our model learns exactly this kind of behavior. Remember that the model learns by propagating gradients through its layers, and that’s unlikely to produce a result so simple. Instead, focus on the intuition that:
- There’s color information embedded in both the image and question vectors.
- After multiplication, certain parts of the result can be used to answer question about color.
Practically, we could’ve used any differentiable method of merging the two vectors. Other merge methods listed under Keras’s Merge Layers section include Add, Subtract, Concatenate, and Average, all of which do what you think they do. Most of these would probably work just as well as Multiply for our simple dataset - feel free to try them out on your own!
6. The Output
Finally, it’s time for our VQA system to produce an answer. Recall that we’re working with a fixed answer set: we know all possible answers and exactly one is guaranteed to be correct.
For this step, we’ll use Softmax to turn our output values into probabilities so we can quantify how sure we are about each possible answer. If you’re unfamiliar with Softmax, I highly recommend reading my explanation of Softmax before continuing.
First, we’ll throw in one fully-connected layer for good measure, then use Keras’s built-in Softmax implementation:
# Merge -> output
out = Multiply()([x1, x2]) # from previous section
out = Dense(32, activation='tanh')(out)
# num_answers will be defined below
out = Dense(num_answers, activation='softmax')(out)
That’s it! All that’s left is to build and compile the model:
from tensorflow.keras.models import Model
from tensorflow.keras.optimizers import Adam

# The CNN
im_input = # ... code from above

# The question network
q_input = # ... code from above

# Merge -> output
out = # ... code from above

model = Model(inputs=[im_input, q_input], outputs=out)
model.compile(
  Adam(lr=2e-4), # somewhat arbitrarily chosen
  loss='categorical_crossentropy',
  metrics=['accuracy'],
)
If you need a refresher, I explained Cross-Entropy Loss in my CNNs series.
7. The Data Processing
Now that we’ve got our model figured out, we just need a bit more code to get all our data ready. For this section, I recommend opening the easy-VQA documentation in a separate tab for reference. I’ll leave out explanations of methods we use from easy-vqa for brevity.
First, we’ll just pull some data from easy-vqa:
from easy_vqa import get_train_questions, get_test_questions, get_answers

# Read question data
# (we already did this in the BOW section, remember?)
train_qs, train_answers, train_image_ids = get_train_questions()
test_qs, test_answers, test_image_ids = get_test_questions()

# Read answer data
all_answers = get_answers()
num_answers = len(all_answers)
Next, we’ll read and pre-process our images:
from easy_vqa import get_train_image_paths, get_test_image_paths
from tensorflow.keras.preprocessing.image import load_img, img_to_array

def load_and_proccess_image(image_path):
  # Load image, then scale and shift pixel values to [-0.5, 0.5]
  im = img_to_array(load_img(image_path))
  return im / 255 - 0.5

def read_images(paths):
  # paths is a dict mapping image ID to image path
  # Returns a dict mapping image ID to the processed image
  ims = {}
  for image_id, image_path in paths.items():
    ims[image_id] = load_and_proccess_image(image_path)
  return ims

train_ims = read_images(get_train_image_paths())
test_ims = read_images(get_test_image_paths())
Then, we’ll create the actual inputs and expected outputs we’ll use to train our model:
from tensorflow.keras.utils import to_categorical

# Create model input images
train_X_ims = [train_ims[id] for id in train_image_ids]
test_X_ims = [test_ims[id] for id in test_image_ids]

# Create model outputs
train_answer_indices = [all_answers.index(a) for a in train_answers]
test_answer_indices = [all_answers.index(a) for a in test_answers]
train_Y = to_categorical(train_answer_indices)
test_Y = to_categorical(test_answer_indices)
Keras’s to_categorical is a handy method to make one-hot vectors out of indices. We need one-hot vectors to match the dimensions of our output Softmax layer.
As an optional step, we’ll setup a Keras ModelCheckpoint to save our best models after every epoch:
from tensorflow.keras.callbacks import ModelCheckpoint

checkpoint = ModelCheckpoint('model.h5', save_best_only=True)
Finally, we’re ready to train!
# Train the model!
model.fit(
  # Reminder: train_X_seqs is from this post's BOW section
  [train_X_ims, train_X_seqs],
  train_Y,
  validation_data=([test_X_ims, test_X_seqs], test_Y),
  shuffle=True,
  epochs=8, # somewhat arbitrary, try more epochs if you have time!
  callbacks=[checkpoint],
)
8. The Results
I won’t include the full code in this post itself to save space, but you can find it here on Github. Copy and paste these lines into your terminal to train the model yourself:
git clone https://github.com/vzhou842/easy-VQA-keras.git
cd easy-VQA-keras
pip install -r requirements.txt
python train.py
Running the code gives us results like this:
Epoch 1/8
loss: 0.8887 - accuracy: 0.6480 - val_loss: 0.7504 - val_accuracy: 0.6838
Epoch 2/8
loss: 0.7443 - accuracy: 0.6864 - val_loss: 0.7118 - val_accuracy: 0.7095
Epoch 3/8
loss: 0.6419 - accuracy: 0.7468 - val_loss: 0.5659 - val_accuracy: 0.7780
Epoch 4/8
loss: 0.5140 - accuracy: 0.7981 - val_loss: 0.4720 - val_accuracy: 0.8138
Epoch 5/8
loss: 0.4155 - accuracy: 0.8320 - val_loss: 0.3938 - val_accuracy: 0.8392
Epoch 6/8
loss: 0.3078 - accuracy: 0.8775 - val_loss: 0.3139 - val_accuracy: 0.8762
Epoch 7/8
loss: 0.1982 - accuracy: 0.9286 - val_loss: 0.2202 - val_accuracy: 0.9212
Epoch 8/8
loss: 0.1157 - accuracy: 0.9627 - val_loss: 0.1883 - val_accuracy: 0.9378
Not bad at all for 8 epochs on such a simple model:
- we reached 93.8% validation accuracy
- we’re clearly seeing training progress (losses decreasing, accuracies increasing)
- the model isn’t overfitting too badly yet (training/validation losses and accuracies are close enough)
If you want, you can experiment on your own with the code to achieve even better results. The Extensions section of my introduction to CNNs with Keras is a good starting point. Given the relative simplicity of this problem, you should be able to pass 99% validation accuracy pretty easily. For reference: the official easy-VQA demo uses a model that achieved 99.5% validation accuracy with only slightly different parameters.
9. The End
You’ve now implemented a working VQA model! This post was just a gentle introduction, though. There’s much more you can do:
- Learn about Recurrent Neural Networks (RNNs), which can be more powerful than the simple BOW-based question model we used.
- Take on the original VQA dataset, which contains much harder images and questions.
- Check out this survey of VQA to understand the more sophisticated methods state-of-the-art models use.
- Try out the CloudCV VQA demo (it’s quite impressive!).
Thanks for reading!
Note: this post used first person (“I”, “my”) to read like it’s me (Victor Zhou) talking. However, as indicated at the very top, this post was co-authored by my good friend Phillip Wang, a recent CS grad from CMU who’s done his fair share of ML. Thanks Phillip!